
This post may contain affiliate links. That means if you click and buy, I may receive a small commission (at zero cost to you). Please see my full disclosure policy for details.
When you start using Pinterest, you will hear bloggers mention the phrase “rich pins.” It does not mean you need to pay to pin. You don’t need to pay Pinterest a dime to use the platform.
Rich pins are a secret tool that every blogger needs to add to their site to help boost impressions, traffic, and hopefully — conversions.
If you are new to blogging or just to Pinterest, you are probably reading everything you can about Pinterest marketing. You probably notice that most of them say pretty much the same thing about setting up your account, pinning schedules, etc. You may also see them all mention that you need to get Rich Pins.
But what are Rich pins? Why do they matter, and how in the world do you add them to your site? We’ll break this all down right now.
Pinterest not sending traffic to your site?
Grab my free quick-start guide to set up your account, learn how to add your boards, create images and develop your strategy.
Quick Navigation
WHAT IS A RICH PIN ON PINTEREST?
Rich Pins are pins that include additional information right on the pin itself. They highlight additional information directly in the pin. Doing so can make the pin more relevant to the pinner, who, in turn, may like, pin, or even click through the pin to learn more.
Here is an example of a recipe that uses Rich Pins. The title includes additional details about the pin, including the time to make and the number it serves. Without that, it would say Easy Stuffed Peppers. Nothing more.
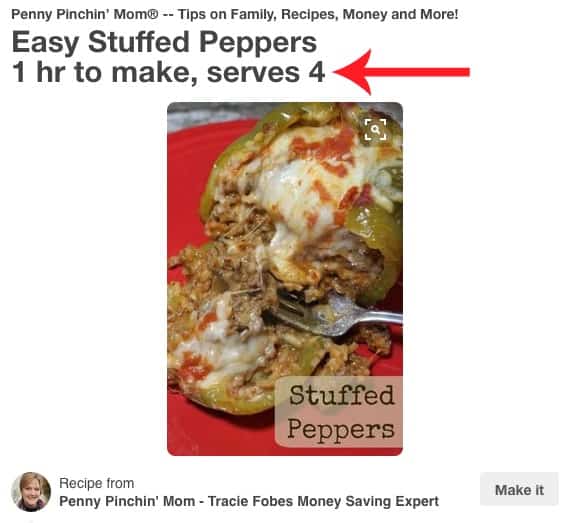
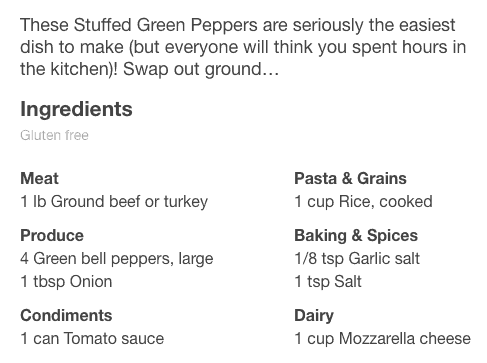
There is more here, which makes this pin stand out. If you scroll down on the pin, you will see that it includes the ingredients – right on the pin! That makes people want to pin it more and can increase clicks to your site where they can get more details.
DO THEY WORK ONLY FOR RECIPES?
Nope – not at all! Rich Pins can help with all of your blogging content. Here are the types of Rich Pins you can have on your site:
Place Pins. These pins include an address, phone number – and even a map – right on the pin! This can assist people in locating your company without having to leave Pinterest.
Article Pins. These Rich Pins include the headline, author, and story description. They help pinners track down (and save) the articles which matter most to them.
Product Pins. I love this one for anyone who sells products (whether your own or via an affiliate link)! These pins include real-time pricing and even share where you can find the product so that your readers can buy it.
App Pins. If you have an app, these Rich Pins will allow readers to download it directly from Pinterest (only available with iOs apps).
Movie Pins. These Rich Pins include reviews and details about the cast members. As a bonus, they include the movie rating, too – all right on Pinterest.
Recipe Pins. These pins include additional details such as ingredients, cooking time, and the number of servings.
WHY DO I NEED RICH PINS?
It’s a common question — why do I need to add rich pins? Pinterest marketers wonder if this makes a difference. Here are the reasons why you need to enable Rich Pins.
Traffic Boost
When readers can get much of the information they need to know about the link before they click over, they are often more likely to click. Consider a product, for example. If you see the price, where to buy it, and details about the item, you would probably click over to buy it. However, if you only saw a shirt and nothing more listed, you may pass. It really can encourage clicks to your site, which therefore increases traffic.
More Information
Pinners want information. They want to know as much about your pin as they can. The more information that you can provide, the more relevant your pin is, and the more likely they are to save the pin.
Price Alerts
One feature you can find in rich product pins is pricing details. If the price drops by more than 10%, Pinterest shoots an alert out to all of the people who pinned your product. That is free advertising for you!
SHOULD FOOD BLOGGERS TURN OFF RICH PINS?
There has been a lot of discussions when it comes to rich pins and food bloggers. Some claim that having all of the info on the pin lowers the click-through rate to the site. These bloggers say that they get more traffic to their site without rich pins.
Yes….and no.
Yes, as you may get more clicks, but the bounce rate is higher. Readers want to know which ingredients are in a dish. They will get to the site, scroll right to the ingredients list, and then often leave. That is a very high bounce rate and lower time on page. That can reduce earnings.
They also may not need to click as they can read the list of ingredients right on the page. If they see something they do not like, they have no reason to click over. And, do you want someone visiting who does not want to be there? I know that I don’t.
Besides, as mentioned above, the bolded titles make the pins stand out. That helps readers know what your pin is about. Without that, they may scroll on by without reading a thing.
Rich pins give more information and help the reader find what he or she needs. When they click, it is done with intent as they are genuinely interested in the post and want to read more.
Don’t fall for the hype of rich pins hurting your traffic when quite the opposite is true.
HOW DO I GET RICH PINS?
Pinterest has a great explanation to help you get started using Rich Pins. You can find that here. I will share some additional detail below.
WORDPRESS (SELF-HOSTED)
Add MetaData. This is necessary to ensure that your pin will pull in the right content. If you use WordPress, I highly recommend the Yoast SEO plugin. This is one of the best plugins you can add to your site to assist your posts in being SEO friendly.
The one thing you need to know once you have this installed is to click on SEO > Social > Facebook. From there, check the box that says “Add Open Graph Meta Data.” This puts the code you need directly onto your blog posts without you manually having to do so.
Validate Your Content. Pinterest needs to see content from your site. Find any post and validate it. It does not matter which one you use, and you only have to do this for once.
Copy the URL for your post and open the Rich Pin Validator. Paste in the URL and hit enter. You should see a message that lets you know that your pin was validated. You should also see a pop up that says, “APPLY NOW.”
Next, you will see an additional pop-up, it will show your website’s domain and the HTML tags. Click “APPLY NOW,” and you are done!
Wait to hear from Pinterest. It can take anywhere from 7 – 10 days for Pinterest to notify you that you’re site is approved and now has Rich Pins. Pin your content, as usual, going forward, and the Rich Pin content will pull in automatically for you.
BLOGGER
Add MetaData. Unfortunately, adding this in is not as simple as it is on WordPress. There are not plugins available, which means you will need to hard code this into your site. It will take more work, but follow these steps to get it set up on your site.
First, go into Settings > Search Preferences > Meta Tags. You will want to enable Descriptions. Make sure you enter a brief description of your site (make sure you include any appropriate keywords).
Next, you need to make sure that you enable the right description. You will have to do this, or Rich Pins will pull in the first few lines of your content with each article you create. To update this section, go into Posts > New Post/Edit Post. Look on the right for Search Description. Update your description for the content here (again, including keywords for your post).
Next, go into your HTML and add in code. If you are not comfortable doing this, you may wish to reach out to your IT person or find someone to do this for you.
To update the code go into Template > Edit HTML > Click in the HTML Editor Box and press CTRL/CMD, which will bring up the search bar. You will want to search for:
<b:includable id=’post’ var=’post’>
Once you bring up that line of code, enter the following directly below this (but do not overwrite any text after this wording – past this BETWEEN the lines of code you see).
<meta expr:content=’data:post.title’ property=’og:title’/>
<meta expr:content=’data:blog.metaDescription’ property=’og:description’/>
<meta content=’article’ property=’og:type’/>
<meta expr:content=’data:blog.url’ property=’og:url’/>
<meta expr:content=’data:blog.title’ property=’og:site_name’/>
<meta expr:content=’data:post.timestampISO8601′ property=’article:published_time’/>
<meta content=’BLOG TOPIC’ property=’article:section’/>
<b:loop values=’data:post.labels’ var=’label’>
<meta expr:content=’data:label.name’ property=’article:tag’/>
</b:loop>
You will also need to change the BLOG TOPIC to be the main topic (which means the Rich Pin Type). This adds the open graph data needed to each blog post so that it can use the information which is already there. You will need to update the meta tag so that it looks like this:
<meta content=’article’ property=’article:section’/>
Note: Change article to recipe or movies, or app, etc – which ever rich pin you are using. If you have errors validating your content, you might also try blogging instead of the rich pin type.
Hit SAVE!!
Validate Your Content. Pinterest needs to see content from your site. Find any post and validate it. It does not matter which one you use, and you only have to do this for once.
Copy the URL for your post and open the Rich Pin Validator. Paste in the URL and hit enter. You should see a message that lets you know that your pin was validated. You should also see a pop up that says, “APPLY NOW.”
Next, you will see an additional pop-up that shows your website’s domain and the HTML tags. Click “APPLY NOW,” and you are done!
Wait to hear from Pinterest. It can take anywhere from 7 – 10 days for Pinterest to notify you that you’re site is approved and now has Rich Pins. Pin your content, as usual, going forward, and the Rich Pin content will pull in automatically for you.
Rich pins are a free tool smart bloggers can use to increase traffic from Pinterest. Take the time to set them up the right way.

Pinterest not sending traffic to your site?
Grab my free quick-start guide to set up your account, learn how to add your boards, create images and develop your strategy.









I will be working on my new pins tomorrow so I can schedule my pins for the month… My goal is to get approved for Mediavine this month.
I also outsourced one of my big blog posts on the massive list of direct selling companies..